Usually in models of trousers, shorts and skirts without a belt, the upper cut is processed by turning. How to properly complete the sewing phase, we tell in our master class.
We will consider the processing of the upper cut of the belt product using the example of model 103 A from Burda 6/2018:
Master Class- Special offer

- 1
- 2
- 3
- 4
Step 1
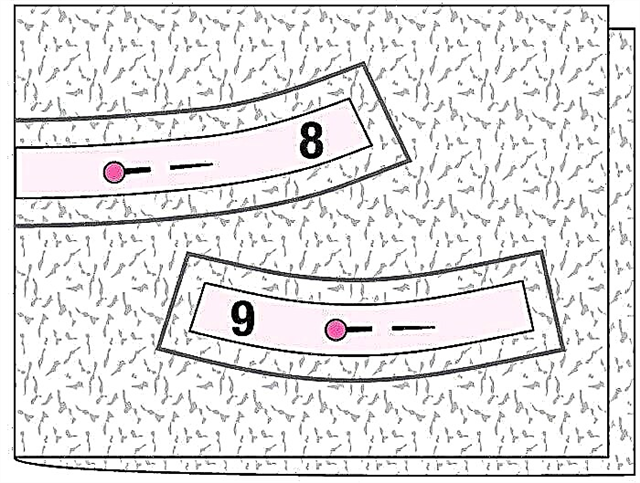
Fold interlining along the adhesive side in half. Pin the details of the paper pattern of the skirts of the upper cut of the short skirt, as shown in the figure. Around the details of the pattern, draw allowances for 1.5 cm wide seams. Cut out the details. Iron the gasket on the seamy side of the trim parts.
Non-woven parts can also be cut out according to the details of the stitches cut from the fabric.
Full-cut neckline and armhole in a sleeveless dress
Step 2
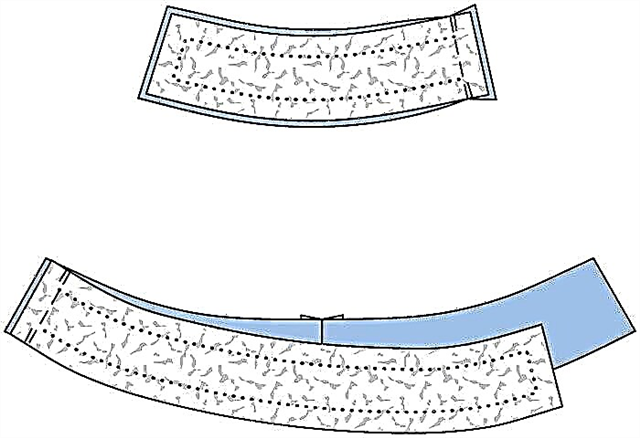
Fold the back cuts of the upper cut with the front sides, grind the middle slices. Iron seam allowances. Place the front edge of the upper cut on the rear edge of the upper cut with the front side to the front side, make the right side seam (symmetrically similar to the seam on the skirt-shorts) (check mark 5). Iron seam allowances. Neaten the lower cut of the grind.
Step 3
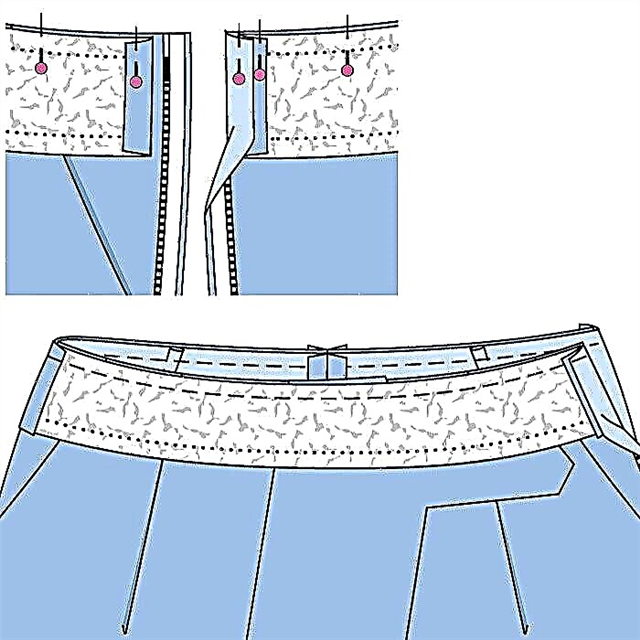
Pin the trim to the upper cut of the short skirt with the front side to the front side, aligning the rear middle seams and the right side seams. Unscrew allowances at the ends of the grind, pin 5 mm to the edges of the cut, pin to the upper cut. On the skirt-shorts, allowances at the edges of the cut, together with the bracelets of the hidden zipper, to unscrew to the front side and pin to the upper cut over the edge. Lay a stitch along the top cut. Cut the seam allowances close to the stitch.
Step 4

Turn the trim up. Iron weld seam allowances to grind and grind close to seam as far as possible. Unscrew the trim on the wrong side, iron the upper edge of the short skirt. Tighten the ends of the lining and sew them by hand to the braid of a hidden zipper. Sew the lower cut of the facing to the allowances of the middle seams and the right side seam.
- Special offer

- 1
- 2
- 3
- 4
- Special offer

- 1
- 2
- 3
- 4
- Special offer

- 1
- 2
- 3
- 4
- Special offer
- 1
- 2
- 3
- 4
How to cut a grinder for processing the upper cut in a belt product with your own hands
If you are sewing a model with a belt provided for in the pattern, and you want to abandon this part, in this case, the upper section of the skirt, shorts or trousers must be treated with a trimmed hem, which is easy to cut by yourself.
The upper cut of the hem should exactly follow the shape of the cut of the skirt or trousers. Therefore, first make all the necessary adjustments to the pattern of the product during the fitting, and only then cut the trim for the details of the pattern.
Hong Kong slicing
Step 1
From the top cut of a skirt or trousers, step back 3-5 cm (width of the hem) and draw a smooth line.
Step 2
Remake the details (detail) of the tracing paper on the tracing paper as separate parts and cut it out.
Step 3
Transfer the contours of the stitches to the fabric and cut them with 1 cm allowances around the entire perimeter.
Important!
- When cutting, the direction of the shared thread on the edges should always coincide with the direction of the shared thread of the processed parts of the skirt or trousers.
- To avoid deformation of the parts of the linings, they must be duplicated. In addition, this will give shape stability to the upper cut of a skirt or trousers.
Source and photo: Burda 6/2018